Follow:

Near-Surface Nanomechanics of Medical-Grade PEEK Measured by Atomic Force Microscopy

https://doi.org/10.3390/polym15030718

“Detecting subtle changes of surface stiffness at spatial scales and forces relevant to biological processes is crucial for the characterization of biopolymer systems in view of chemical and/or physical surface modification aimed at improving bioactivity and/or mechanical strength. Here, a standard atomic force microscopy setup is operated in nanoindentation mode to quantitatively mapping the near-surface elasticity of semicrystalline polyether ether ketone (PEEK) at room temperature. Remarkably, two localized distributions of moduli at about 0.6 and 0.9 GPa are observed below the plastic threshold of the polymer, at indentation loads in the range of 120–450 nN. This finding is ascribed to the localization of the amorphous and crystalline phases on the free surface of the polymer, detected at an unprecedented level of detail. Our study provides insights to quantitatively characterize complex biopolymer systems on the nanoscale and to guide the optimal design of micro- and nanostructures for advanced biomedical applications.”

AFM-based nanoindentation of complex biopolymers focused on loading-unloading indentation measurements under different loading conditions to study the nanomechanical properties and viscoelasticity of samples [33,34,37,38]. In this context, the potential of this technique has been explored to characterize the plasticity of PEEK up to nanometric resolution [38,39,40]. Hence, there is a lack of studies exploring the nanomechanics of PEEK under elastic indentation regime, where small (<1 µN) loading forces and indentation depths much smaller than 100 nm are involved [33]. Typically, for small loading forces immediately after contact (i.e., along the loading curve), the tip–polymer interaction is poorly affected by adhesion, plastic deformations and time-dependent phenomena; only elastic deformations will be present and elastic theories, e.g., Hertz theory, can be used [41]. Furthermore, performing nanoindentations at high loading rates allows minimization of the residual imprints of nanoindentation; as a consequence, loading–unloading will be dominated by elastic behavior with negligible irreversible deformation [32]. Therefore, considering suitably small forces and reversible surface deformation simplifies the experiments and, at the same time, enables the study of PEEK under conditions relevant to biological systems.
This work explores the potential of AFM in investigating the elasticity of PEEK at the nanoscale. To this aim, a standard experimental setup with nanometrically sharp tips (spherical shape with curvature radius of R = 10 nm) and moderate cantilever stiffness (from about 9 to 29 N/m) was used. Nanoindentations were operated on a grid pattern within 5 × 5 µm2 large topographies of the sample, with loading–unloading curves extracted at each point of the grid. Besides E, other useful quantities derived from the curves could be mapped, such as the maximum indentation depth hmax and the elasticity index, 0 < ηel < 1; the latter is defined as the ratio between the areas under the unloading and loading curves and indicates the degree of elasticity of the deformation at each point of indentation [35,42]. We show that these three quantities, which can be obtained simultaneously from a single indentation grid, provide comprehensive characterization of the nanomechanics of PEEK and promote AFM-based nanomechanical mapping as a mean to identify and quantify the spatial localization of the moduli originated by the contributions of different surface phases of the polymer, as well as to monitor changes of such distributions due to chemical and physical modification of the surface.

2.1. Samples, AFM Setup and Calibration

The PEEK samples were medical-grade sheets (10 × 10 × 6 mm height; Direct Plastics Ltd., Sheffield, UK) with semimachined surfaces, as described previously [43]. AFM measurements were performed by a NT-MDT (Moscow, Russia) system equipped with an upright optical microscope. NSG10 and NSG30 tips (NT-MDT, Moscow, Russia) with resonant frequencies in the range of 140–390 kHz were used. Topographies were taken at a 256 × 256-pixel resolution and acquired in tapping mode of operation. The cantilever stiffness k was measured according to Sader [35], a procedure implemented into the acquisition software (NOVA, MT-MDT, Moscow, Russia). The cantilever deflection sensitivity was calibrated from a set of indentation curves previously obtained under hard-contact regime on a clean and nanometrically flat silica slice (~80 GPa in stiffness); such procedure prevents from damages the tips actually used. PEEK slices were mounted on the sample stage and characterized both topographically and by extraction of force curves. Before and after mapping, the integrity of the tips was checked via z-axis calibration on a TGS1 calibration grating (NT-MDT, Moscow, Russia; grid TGZ1 with a height of (21 ± 1) nm). Two-dimensional arrays of F-d curves (1000 points each) were acquired at six non-overlapped 5 × 5 µm2 areas on 20 × 20 grids. Note that the spatial resolution of the mapping is equal to the distance between the indents. In this work, a distance of 5000 nm/20 = 250 nm was set according to theoretical considerations [44,45] and to reduce the acquisition time of a single map (<1 h). The loading/unloading rate was fixed at 500 nms−1 for all indentation tests. Several survey curves were taken before mapping to verify that hmax fell in the range suitable to the model used (see later).

2.2. Indentation Modulus Calculation

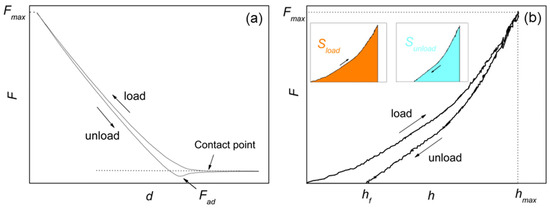
Figure 1a illustrates a typical loading–unloading or force–distance (F-d) curve, with indication of the adhesion force Fad (typically, <10 nN in our measurements) and contact point. The calibration operation converts the F-d into the corresponding F-h curve (Figure 1b), where h is the penetration depth. Referring to the areas in colors in Figure 1b, ηel = Sunload/Sload for each curve was calculated; for a totally plastic sample, ηel = 0, while for a totally elastic sample, ηel = 1 [35].
Figure 1. (aF-d curve with indication of the contact point and adhesion force Fad. (b) Force-penetration (F-h) curve equivalent to F-d, with indication of the effective and maximum penetration depths hf and hmax and the maximum force load Fmax = F(hmax). In the inset, the areas under the load (Sload) and unload (Sunload) curves are evidenced in colors.
According to the Hertz theory, in case of a spherical indenter of radius R, purely elastic deformation and negligible adhesion force Fad, the Young’s modulus E of an isotropic, homogeneous sample will follow the well-known h−3/2 dependence [35,44]. Following a previous work of this group [41], in this study E is calculated by the modified Hertz formula introduced by Kontomaris [44,45], which accounts for indentations comparable to or higher than the dimension of the indenter (h ≥ R). This modified Hertz formula differs from the original by a factor depending on h/R; if h < R, the original Hertz formula is obtained. If h >> R, linear dependence is obtained [45].

2.3. Data Processing and Analysis

Indentation maps obtained by AFM were processed using an assembly of different algorithms implemented as a Python module [46] that could be adapted to a user’s computational needs, as described previously [43]. In brief, the software processes the F-d curves, aligning them and separating loading and unloading curves to generate F-h curves. Then, the indentation modulus E was calculated applying the modified Hertz formula of Section 2.2 to the loading part of the F-h curve. The Poisson’s ratio of PEEK (ν = 0.38) and the radius R enters into calculation of E. Following previous studies [33,43], an uncertainty of 10% on these quantities was propagated. Then, the uncertainty ΔE and the correlation coefficient of the fitting r2 were computed. Afterward, to assess the correctness and the consistency of the data, rejection criteria based on r2 and ΔE/E can be tailored according to the given experimental context. In the present study, the conditions r2 > 0.95 and ΔE/E < 30% were required; this caused -in average- rejection of <3% of the acquired curves.

3. Results

3.1. Checking the Elastic Response of the Surface
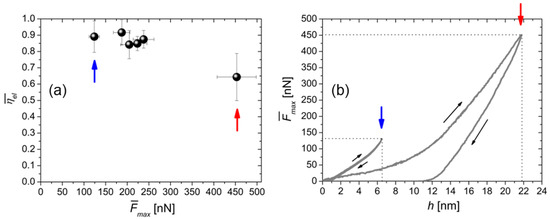
PEEK indentations by cantilevers with different stiffness produced, in general, different mechanical responses. Thus, cantilevers with different k were used while ηel was continuously monitored during data acquisition to ensure that the condition ηel ~ 1 (elastic behavior) was fulfilled. Furthermore, an uncertainty of 10–15% on F¯¯¯max�¯��� was determined by statistical analysis; such statistical fluctuations are due to instrumental and local contact instabilities. For each map, η¯el�¯�� and the corresponding F¯¯¯max�¯��� were extracted as an average. Assuming homogeneous mechanical response of the surface, the six η¯el�¯��(F¯¯¯max)�¯���) values were plotted in Figure 2a at increasing F¯¯¯max�¯���. Note that elastic deformations were produced up to a load of ~450 nN, which represents the transition point for plastic deformation in this work (ηel~0.6). For the sake of clarity, two representative F-h curves corresponding to the lowest and highest loads (the first and last points of Figure 2a, respectively), are shown (Figure 2b). Note that the hmax values (6.3 nm and 21.8 nm respectively) fall in the range of validity of the modified Hertz model used to fit the data (Section 2.2). On the other hand, the effective penetration depth hf is less than 1 nm for the left curve, while exceeds 12 nm for the right one. The larger hf value implies a lower fitting quality with higher deformations, as only elastic deformations were assumed, as discussed in the following.
Figure 2. (a) Plot of η¯el�¯�� vs. F¯¯¯max�¯���. (b) Two representative F-h curves taken from the maps recorded respectively at F¯¯¯max�¯��� = (120 ± 11) nN and (453 ± 49) nN and corresponding to η¯el�¯�� = (0.891 ± 0.096) and (0.643 ± 0.146), namely the first and last points of the graph in (a). Blue and red arrows are a guide to the eye.

3.2. Force-Mapping Results

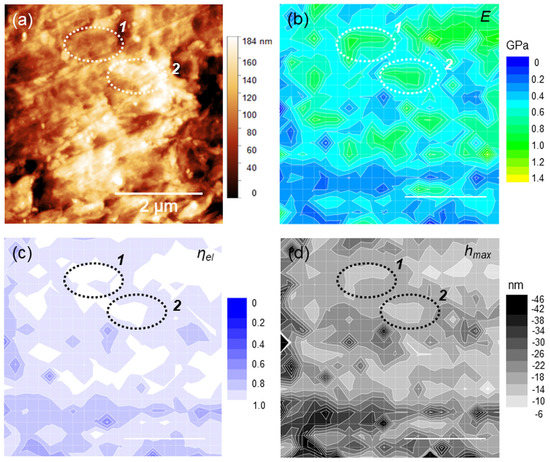
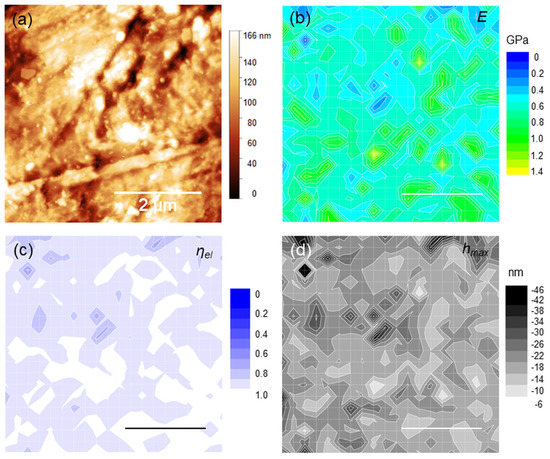
Sample areas 5 × 5 µm2 large were considered for the AFM analysis, based on a preliminary survey of the surface and previous studies [34,40]. In Figure 3a, a topographic image (roughness 15.6 nm, peak-to-peak height 184 nm) is shown along with the corresponding maps of Eηel and hmax. (Figure 3b–d). By way of example, two features 1 and 2 are evidenced in the topography. These features are separated by a step height of (20 ± 5) nm along the z-axis. At the same positions, two distinct regions or “islands” of localized moduli at ~0.9 GPa can be observed (Figure 3b). Significantly, both the regions exhibited purely elastic response (ηel~0.95), with the same deformation hmax~12 nm (Figure 3c,d). Although similar correspondences between topographies and maps can be observed likewise at different positions, they are—in general- quite elusive. This is the case of Figure 4 (roughness 17.5 nm, peak-to-peak height 166 nm), where several small (<1 µm) islands were detected; remarkably, these islands appear prevalently elastic in nature and correspond to the smallest hmax within the image. Nevertheless, the topographic step heights measured in correspondence of the islands are too small (<5–10 nm) to be significant in relation to the image roughness.
Figure 3. (a) 5 × 5 µm2 topography with indication of two features of interest (1 and 2); (bdEηel and hmax maps of the same region.
Figure 4. (a) 5 × 5 µm2 topography of a different sample region; (bd) corresponding Eηel and hmax maps.
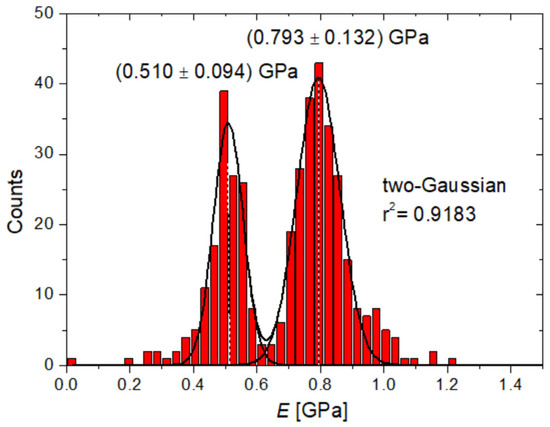
For quantitative analysis, statistical histogram plots of moduli were extracted from each map, as in Figure 5. To account for the presence of two distinct peaks in the distributions, two-Gaussian functions were used to fit the data, corresponding to lower and higher distributions of moduli with calculated peaks at E1 and E2, respectively. The results obtained for the six regions considered are summarized in Table 1 at increasing loads.
Figure 5. Representative statistical histogram of the moduli extracted from the E map measured at F¯¯¯max�¯��� = (187 ± 19) nN, with indication of the corresponding two-Gaussian fitting.

Leave a Comment